By: CS2103T F10-1 Since: Jan 2020 Licence: MIT
{ start of introduction section written by: Nguyen Chi Hai }
- 1. Introduction
- 2. About this guide
- 3. Quick Start
- 4. Features
- 4.1. Viewing help :
help - 4.2. Editing user profile:
me - 4.3. Listing all items :
list - 4.4. Adding an item:
add - 4.5. Editing an item :
edit - 4.6. Finding items by name:
find - 4.7. Deleting an item :
delete - 4.8. Sorting an item list :
sort - 4.9. Viewing an item in details:
view - 4.10. Modifying the content a resume:
redit - 4.11. Pulling tagged items into a resume:
tagpull - 4.12. Undoing a command:
undo - 4.13. Redoing a command:
redo - 4.14. Previewing a resume:
rpreview - 4.15. Generating a resume:
rgen - 4.16. Marking a note as done:
done - 4.17. Clearing all data:
clear - 4.18. Exiting the program :
exit - 4.19. Saving the data
- 4.20. Encrypting data files
[coming in v2.0]
- 4.1. Viewing help :
- 5. FAQ
- 6. Command Summary
1. Introduction
Hello fellow University friends! Have you ever found writing resumes for job and internship applications a hassle? Have you ever dreamt about an app that can help you manage different resumes for different companies? Have you ever wished for a more streamlined Command Line Interface application that can match your efficiency and typing prowess?
If this sounds like you, ResuMe is the resume managing application for you! Made by University students for University students with looovee, this wonder understands your struggle and strives to cater to your specific resume needs and job application woes.
{ end of introduction section written by: Nguyen Chi Hai }
1.1. Overview
ResuMe allows the management of five different item types:
| No. | Item type | Alias | Attributes |
|---|---|---|---|
1 |
Internship |
int |
name, role, from, to, description, tag |
2 |
Project |
proj |
name, time, website, description, tag |
3 |
Skill |
ski |
name, level, tag |
4 |
Resume |
res |
name, tag |
5 |
Note |
note |
name, time, tag |
As you may have noticed from number 4, we are able to manage different resume items as well!
Items from number 1 to 3 can be shared across different resume items.
1.2. Preview
The following is the GUI for our application:

GUI Components:
-
Command box: where you enter your commands.
-
Result box: where the result of a command is shown. It can show a success message or a failure message if something wrong happens.
-
View box: where the detailed information about an item is shown. For instance, if you are viewing an
internshipitem, this box shows in full thecompany name,role,from,to,descriptionandtags. -
List box: where all items of a certain type are listed. Only one type is displayed at a time. You can change the view of this list using
listcommand. Additionally, when other commands change items of a certain type, the list box will be set to display that type. -
User box: where you can view your personal information like
name,email, orphone number. Any changes made to your user profile will be automatically reflected here. -
Note box: where you can view your list of
noteitems. You can also change the view of this list by usinglistcommand. When anoteis marked as done, this box will be automatically updated.
Interested? Jump to Section 3, “Quick Start” to get started. Enjoy!
{ start of about guide section written by: Pham Thuy Duong }
2. About this guide
Our aim when writing this document is to help you - a new user - get started with ResuMe as quickly as possible. The guide features all the available commands, their syntax, as well as specific examples for illustration.
This section is, well… a guide on how to use this guide :) We will be explaining some of the symbols and formatting used, key terms, as well notes and tips for a better user experience.
2.1. Symbols and Formatting
Most of us are visual learners, and we figured, what is a better way to present information than using some shapes and colours?
| Symbol / Format | Explanation |
|---|---|
Important information to take note |
|
Tips |
|
Warnings on potential misuse |
|
|
Keywords representing an |
2.2. Key terms
You will come across these little guys a lot in this document, so let’s get to know them first!
| Term | Explanation |
|---|---|
|
Consisting of five different types: |
|
An item stored in the application, which could be any one of the five types above |
|
A line of text that you could type into the command box and execute |
|
Specific information about an |
|
The position of the |
{ end of about guide section written by: Pham Thuy Duong }
3. Quick Start
-
Ensure you have Java
11or above installed in your Computer. -
Download the latest
CS2103T-F10-1.ResuMe.jarhere. -
Copy the file to the folder you want to use as the home folder for your ResuMe application.
-
Double-click the file to start the app. The GUI should appear in a few seconds.
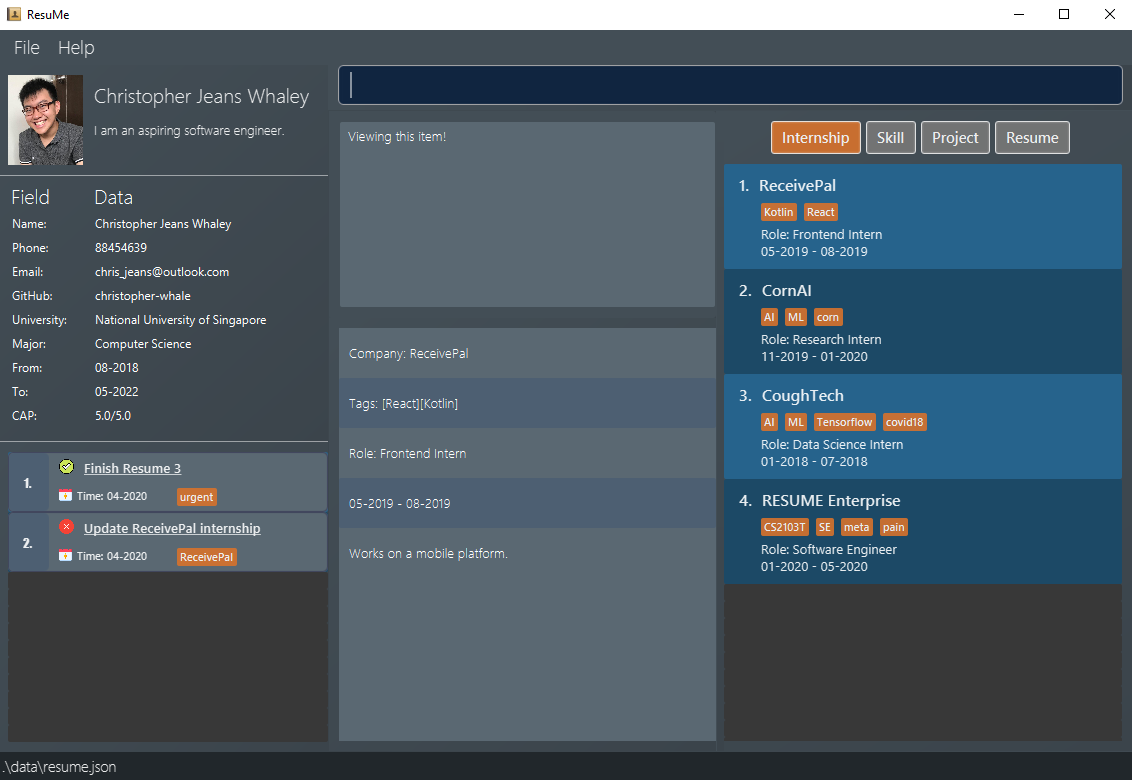 Figure 2. The GUI of ResuMe
 -
Type a command in the command box and press Enter to execute it.
e.g. typinghelp startand pressing Enter will open the help window for getting started. -
Try out these example commands:
-
list i/ res: lists allresumeitems. -
add i/ res n/ Software Engineering Resume #/ SE #/ frontend: adds aresumenamedSoftware Engineering Resumewithtags"SE" and "frontend". -
delete 1 i/ res: deletes the 1stresumeshown in the resume list. -
exit: exits the app.
-
-
Refer to Section 4, “Features” for details of each command.
4. Features
For this section, we will introduce you to all of the available features of our application.
Command Format
-
Words in
UPPER_CASEare the parameters to be supplied by you.
For example, inadd i/ TYPE n/ NAME,TYPEandNAMEare parameters which can be customised to beadd i/ proj n/ Orbital. -
Parameters in square brackets are optional.
For example,n/ NAME [#/TAG]can be used asn/ Orbital #/ SEor asn/ Orbital. -
Parameters with
…after them can be used multiple times including zero times.
For example,[#/ TAG]…can be used as:-
(i.e. 0 times)
-
#/ SE -
#/ SE #/ frontendetc.
-
-
Parameters can be in any order.
For example, if the command specifiesn/ NAME p/ PHONE_NUMBER,p/ PHONE_NUMBER n/ NAMEis also acceptable.
{ start of help section written by: Pham Thuy Duong }
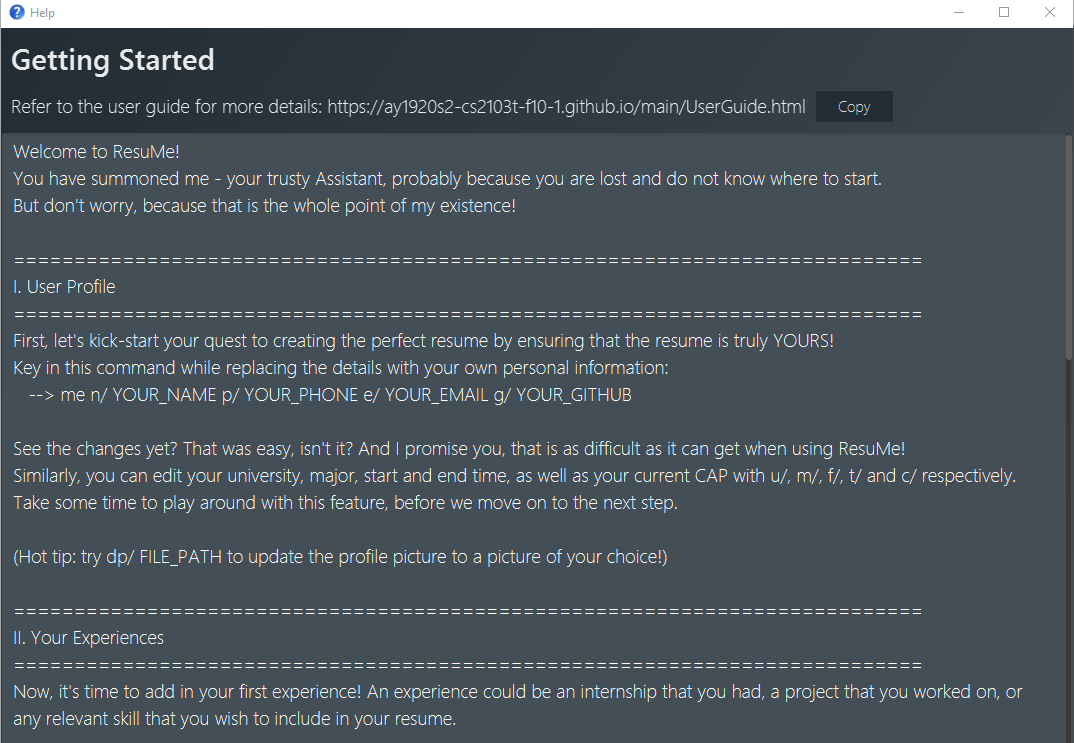
4.1. Viewing help : help
Lists out the function and usage of each command.
Format: help OPTION
There are two possible help options that you can choose from, as shown in the table below:
| Option | Format | Result |
|---|---|---|
command |
|
Opens a pop-up window with a summary of available commands, their syntax and usages. |
start |
|
Opens a pop-up window with detailed guide on how to get started. |
These are screenshots of the two pop-up windows:

{ end of help section written by: Pham Thuy Duong }
{ start of me section written by: Nham Quoc Hung }
4.2. Editing user profile: me
You can edit your display profile here! It will then be updated accordingly in the user box. Feel free to edit only one or multiple fields at a time :)
Format: me [dp/ FILE_PATH] [n/ NAME] [d/ DESCRIPTION] [p/ PHONE_NUMBER] [e/ EMAIL] [g/ GITHUB] [u/ UNIVERSITY] [m/ MAJOR] [f/ FROM] [t/ TO] [c/ CURRENT_CAP MAX_CAP]
A user profile contains the following fields: DisplayPicture, Name, Description, Phone, Email, Github, University, Major, From, To, CAP.
|
-
We note that these fields are your essential information which will be displayed in the PDF file of every generated resume. As such, each field comes with a format check which you need to fulfill in order to make a valid change.
| Field | Format |
|---|---|
Display Picture |
Has to be a valid image file ending with .jpg, .png or .jpeg. |
Name |
Should only contain alphanumeric characters and spaces, and it should not be blank. |
Description |
Can take any characters and it should not be blank. |
Phone |
Should only contain numbers, and it should be at least 3 digits long. |
Must follow a valid email format. |
|
Github |
Must follow a valid github username format. |
University |
Should only contain alphanumeric characters and spaces, with a maximum of 50 characters and should not be blank. |
Major |
Should only contain alphanumeric characters and spaces, with a maximum of 50 characters and should not be blank. |
From |
Should be in the format of MM-yyyy. |
To |
Should be in the format of MM-yyyy and must not be an earlier date than From. |
Cap |
Must be in the format of "CURRENT_CAP MAX_CAP" where "CURRENT_CAP" is not greater than "MAX_CAP". Must contain only non-negative numbers. |
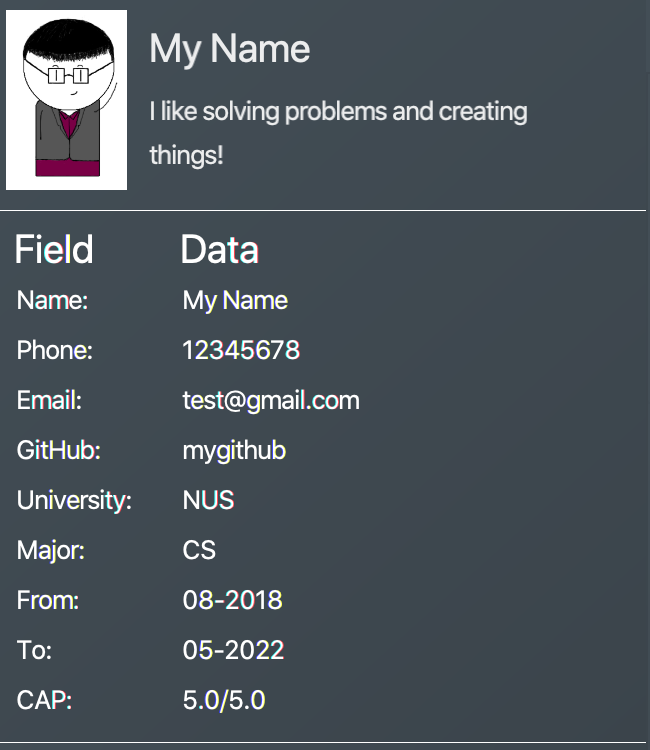
Example 1: Update user profile details
Try typing in the command box this command:
me n/ My Name p/ 12345678 e/ test@gmail.com d/ I like solving problems and creating things! g/ mygithub u/ NUS m/ CS f/ 08-2018 t/ 05-2022 c/ 5.0 5.0
Outcome:
The user box will be swiftly updated to showcase all your essential information:
Example 2: Update user profile picture
Now, let’s make your profile even more customisable. Follow the steps in one of these two links below if you do not know how to copy an full file path from your computer.
Afterwards, try a command similar to the one of the two below, depending on your operating system:
me dp/ /Users/nhamquochung/Desktop/test.png (for Mac)
me dp/ C:\Users\Christian J. Welly\Pictures\chrisjwelly.jpg (for Windows)
Outcome:
Tada! The user box will be updated to display your beautiful picture:

{ end of me section written by: Nham Quoc Hung }
{ start of list section written by: Nguyen Chi Hai }
4.3. Listing all items : list
Lists items in the storage.
Format: list i/ TYPE
|
|
|
Examples:
-
list i/ res: Lists allresumeitems.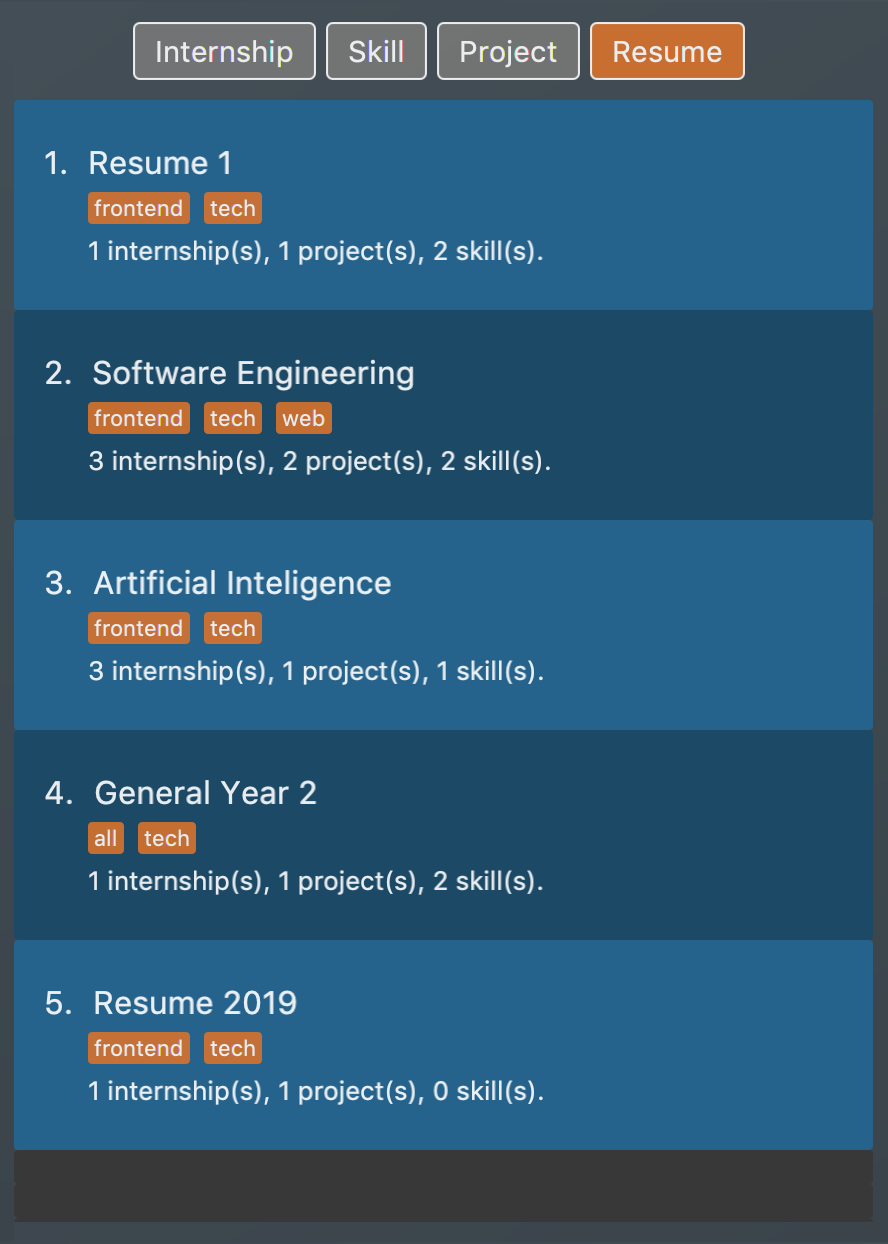 Figure 7. List of all resume items
 -
list i/ int: Lists allinternshipitems.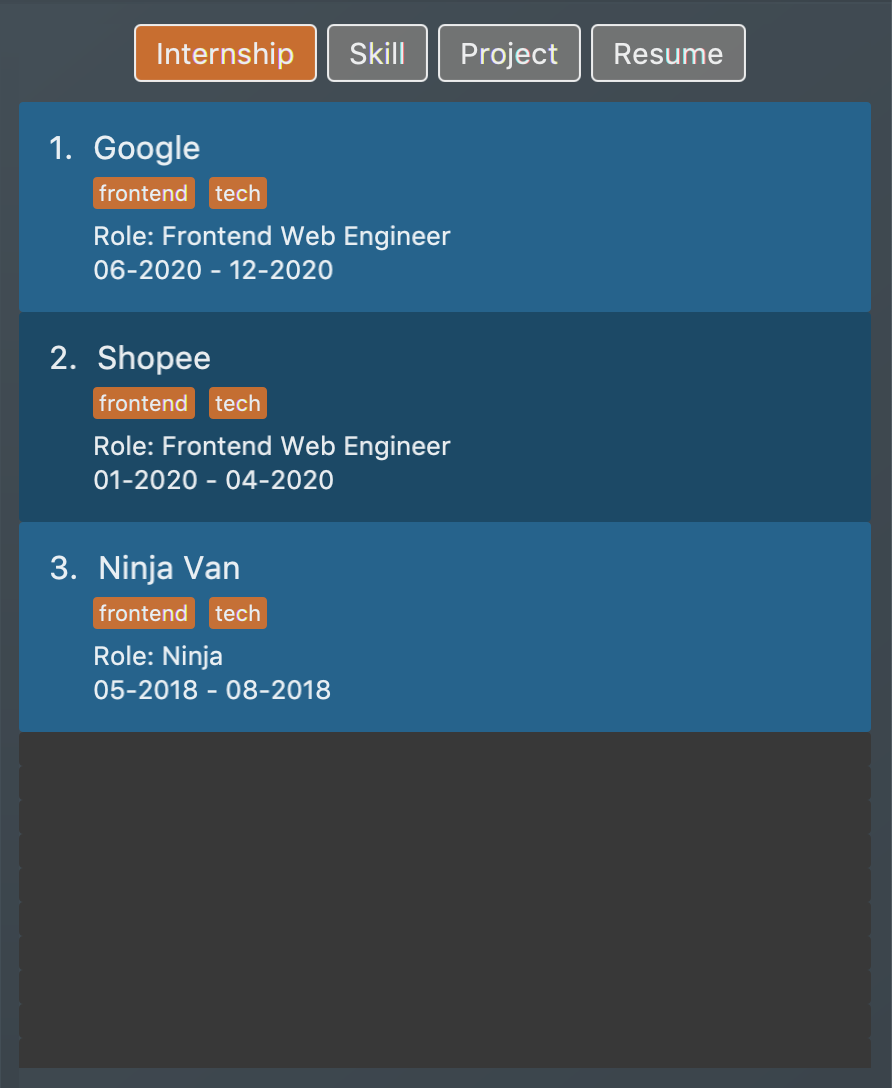 Figure 8. List of all internship items
 -
list i/ note: Lists allnoteitems.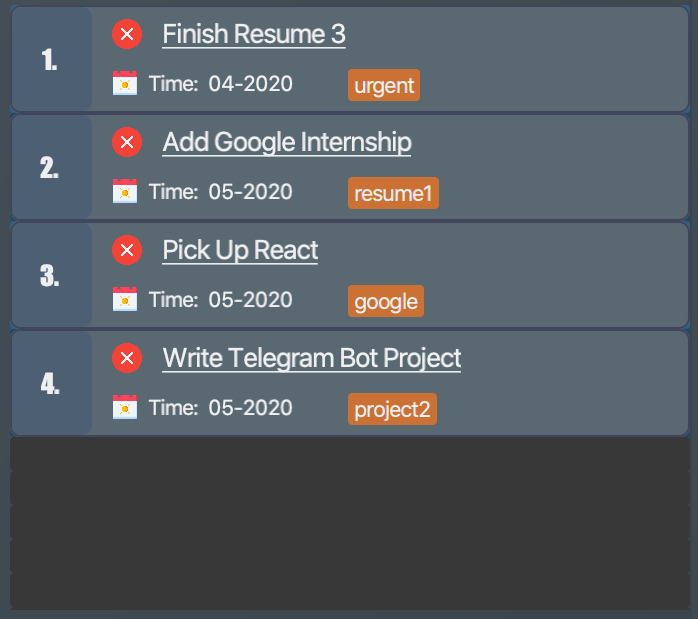 Figure 9. List of all note items
{ end of list section written by: Nguyen Chi Hai }
{ start of add section written by: Pham Thuy Duong }
4.4. Adding an item: add
Adds an item to the ResuMe application.
Format: add i/ TYPE n/ NAME [ATTRIBUTE/ VALUE]… [#/ TAG]…
The specific command syntax could be found in the table below:
| Type | Format |
|---|---|
Internship |
|
Project |
|
Skill |
|
Resume |
|
Note |
|
|
The description of an item could be written in one paragraph (with full stop and a space after each sentence).
These sentences, when exported to .pdf format, will be automatically shown as individual bullet points!
(refer to rgen for more details)
|
Example: Try typing in the command box these two commands one by one!
-
list i/ proj -
add i/ proj n/ Duke t/ 06-2020 w/ abc.github.io d/ For a little module named CS2103T. #/ java #/ tech
Outcome:
-
All
projectitems are listed in the list box.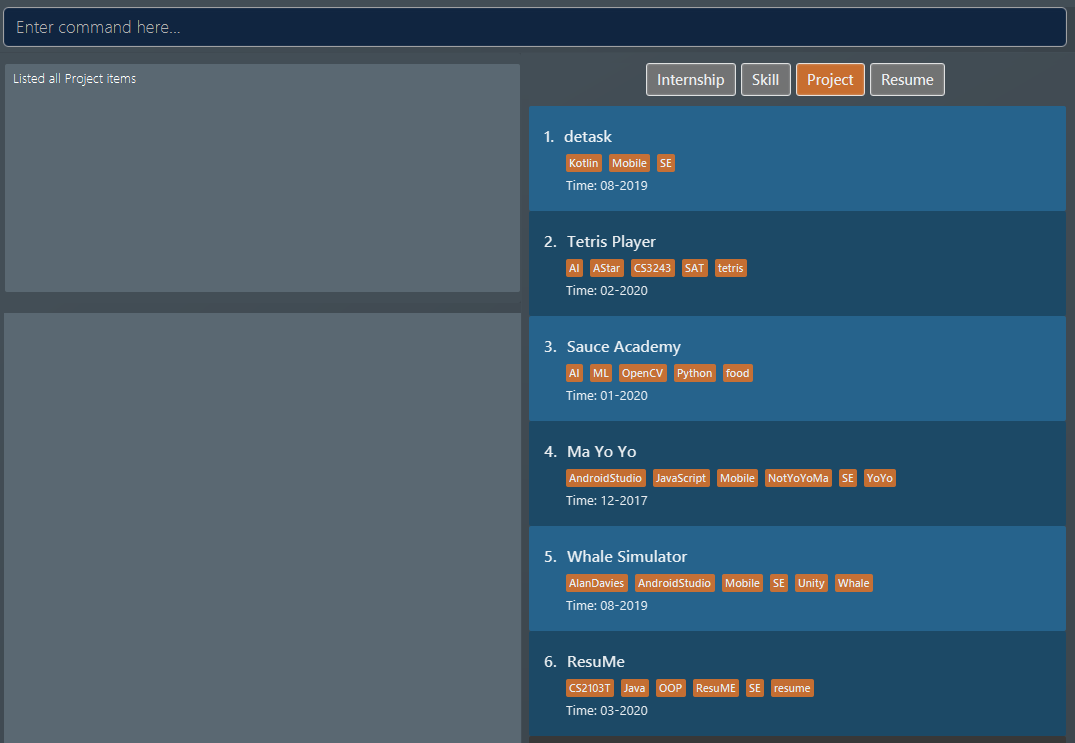 Figure 10. List of all project items
 -
A new
projectitem named "Duke" with the specified fields is added. This item is automatically reflected in the list box.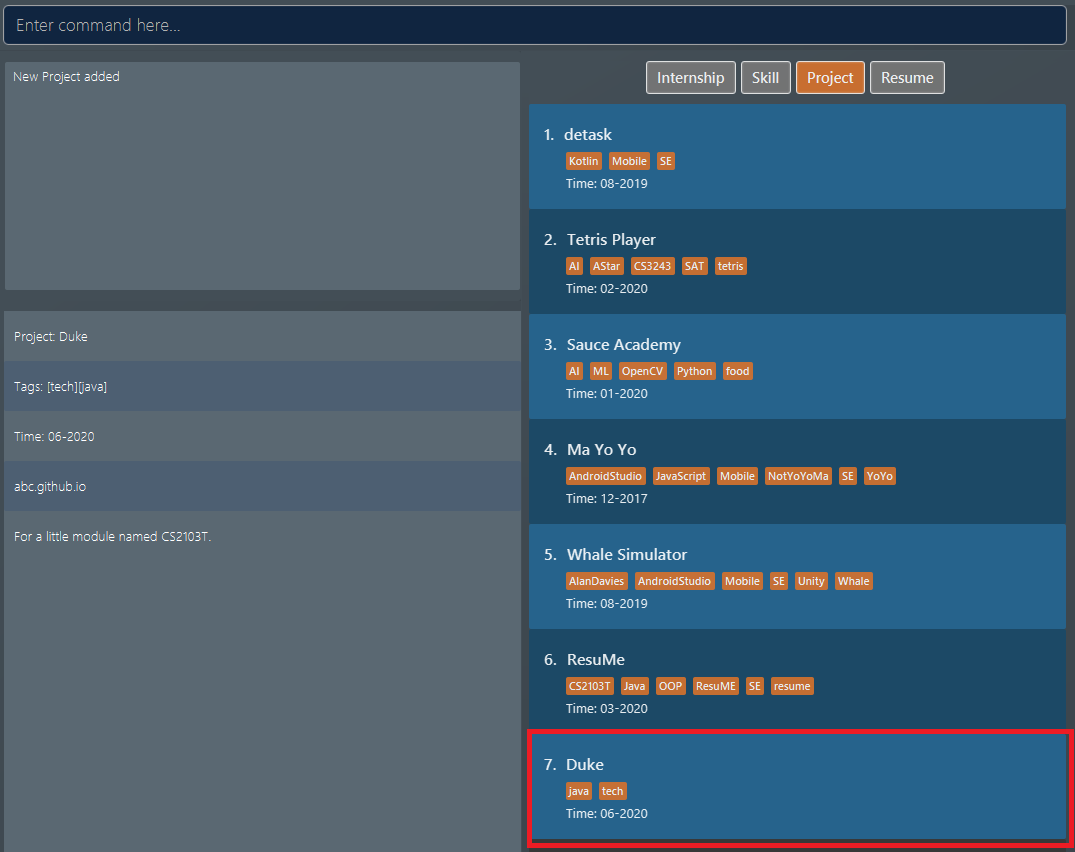 Figure 11. Application view after project "Duke" is added
{ end of add section written by: Pham Thuy Duong }
{ start of edit section written by: Christian James Welly }
4.5. Editing an item : edit
Edits an existing item in the ResuMe application.
edit is a different command from redit. Please visit FAQ for more information.
|
Format: edit INDEX i/ TYPE [ATTRIBUTE/ VALUE]… [#/ TAG]…
| Type | Format |
|---|---|
Internship |
|
Project |
|
Skill |
|
Resume |
|
Note |
|
Example 1: Try typing in the command box these two commands one by one!
-
list i/ res -
edit 1 i/ res n/ Software Engineering Resume #/ agile
Outcome:
-
The first command lists all
resumeitems in the list box. Assuming you want to edit theresumeitem at index 1.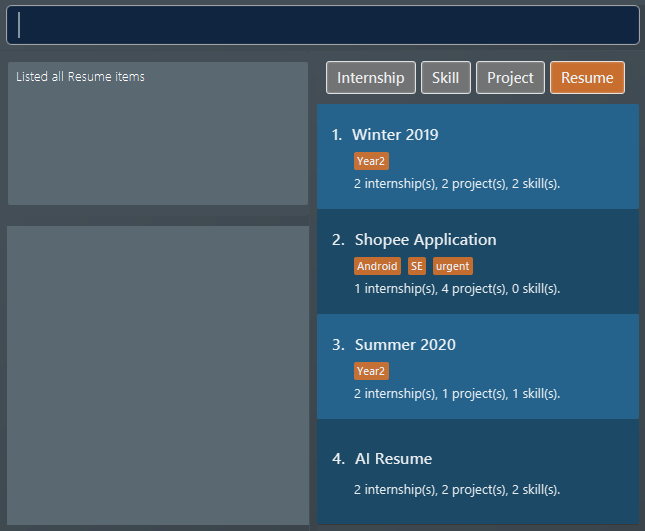 Figure 12. List of all resume items
 -
The second command edits the
resumeitem at index 1. It has its name changed from "Winter 2019" to "Software Engineering Resume" and itstagset to "agile".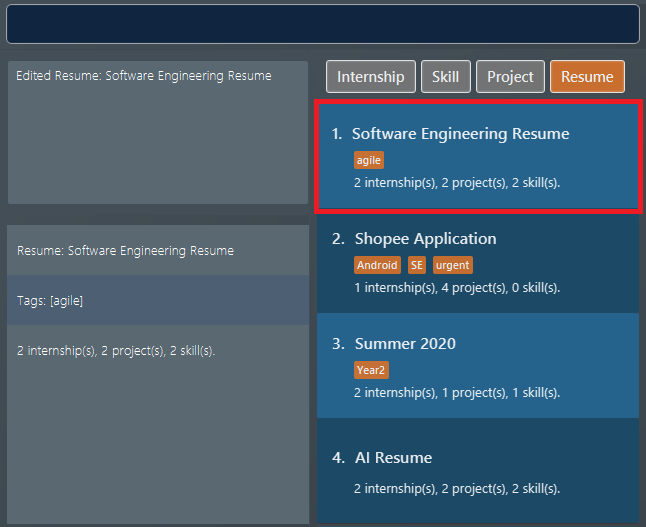 Figure 13. Application view after editing the resume item at index 1
Example 2: Here is another way you can use edit. This time, we will try an example using skill items. Try typing in the command box these two commands one by one!
-
list i/ ski -
edit 2 i/ ski l/ ADVANCED #/
Outcome:
-
The first command lists all
skillitems in the list box. Assuming you want to edit theskillitem at index 2.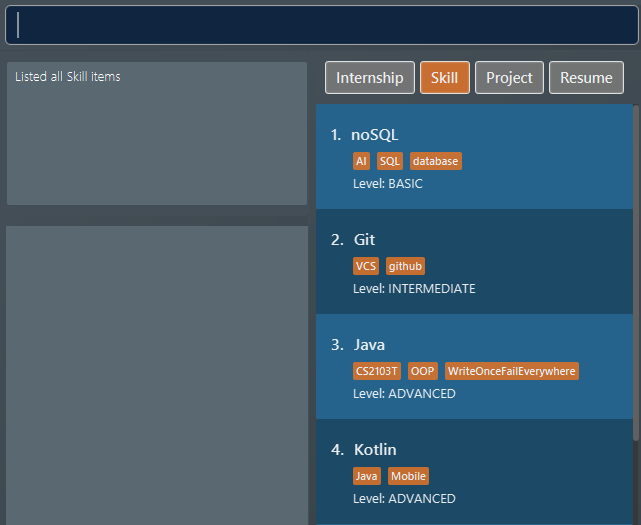 Figure 14. List of all skill items
 -
The second command edits the
skillitem at index 2. It has itslevelchanged to fromINTERMEDIATEtoADVANCEDand all its existingtagscleared.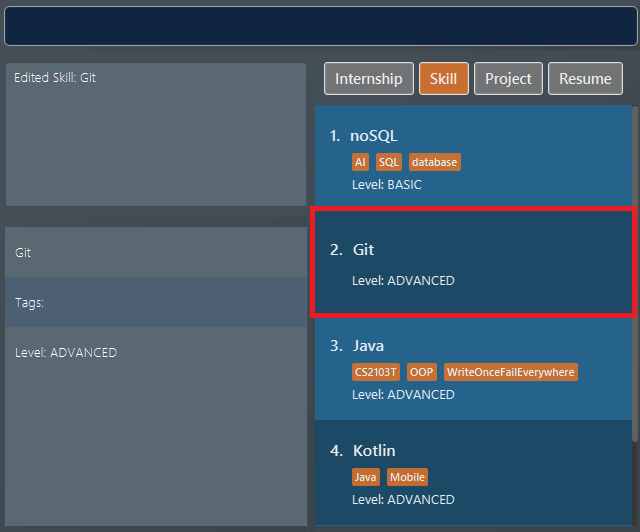 Figure 15. Application view after editing the skill item at index 2
{ end of edit section written by: Christian James Welly }
{ start of find section written by: Nham Quoc Hung }
4.6. Finding items by name: find
Finds items of a specific type in the corresponding list of items whose names contain the specified keyword(s).
Format: find KEYWORD [MORE_KEYWORDS]… i/ TYPE
The specific command syntax could be found in the table below:
| Type | Format |
|---|---|
Internship |
|
Project |
|
Skill |
|
Resume |
|
Note |
|
Example: Try typing in the command box these commands one by one!
-
list i/ proj -
find Orbital i/ proj
Outcome
-
All
projectitems are listed in the list box. A sample project list is shown below.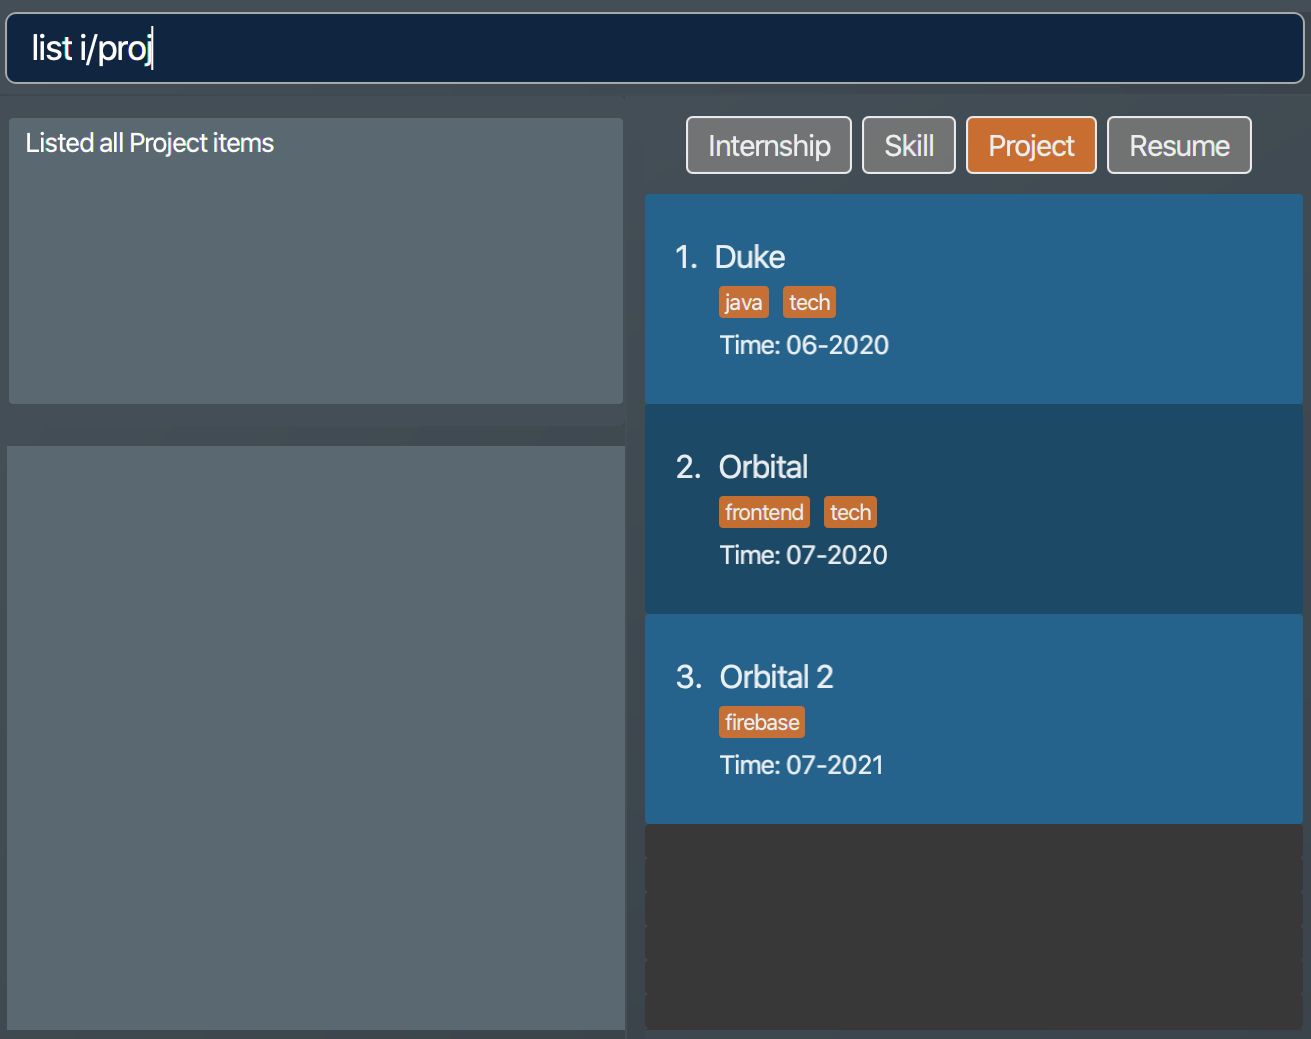 Figure 16. List of all project items
 -
Projectswhose names match keywords are listed in the list box.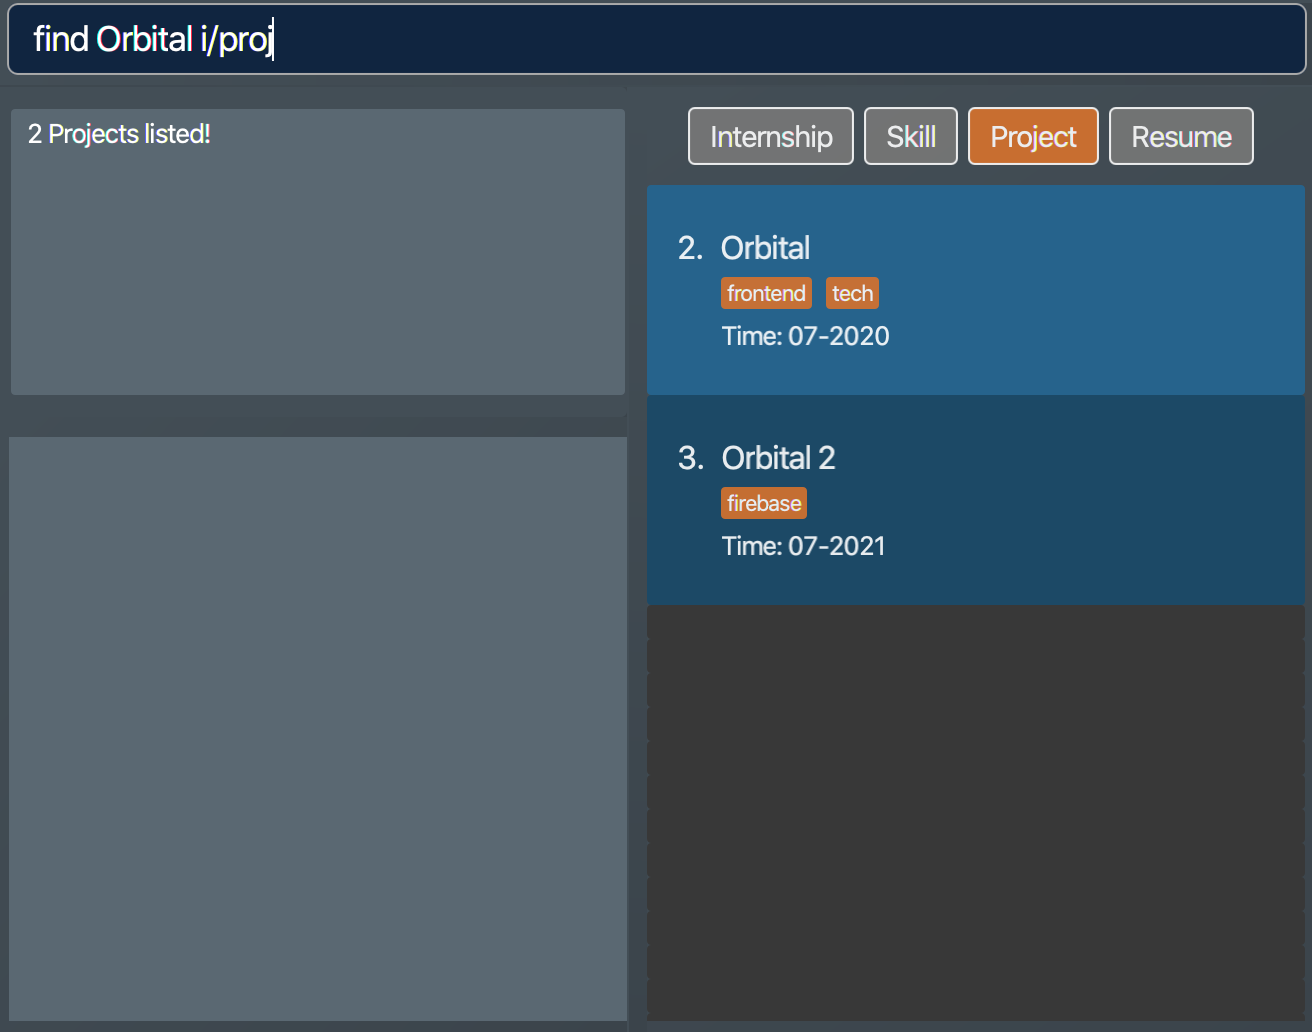 Figure 17. Filtered list of project items whose names contain "Orbital"
{ end of find section written by: Nham Quoc Hung }
{ start of delete section written by: Nguyen Minh Hoang}
4.7. Deleting an item : delete
Deletes an existing item from the ResuMe application.
Format: delete INDEX i/ TYPE
|
Use list command to navigate to the correct list to ensure that 1) the item exists, and 2) you know the
correct index for deletion. Or just fall back on undo if you accidentally delete the wrong item.
|
Example:
-
Suppose we start with the following original list of
resumeitems, as seen using the commandlist i/ res. Pay attention to the secondresumeitem.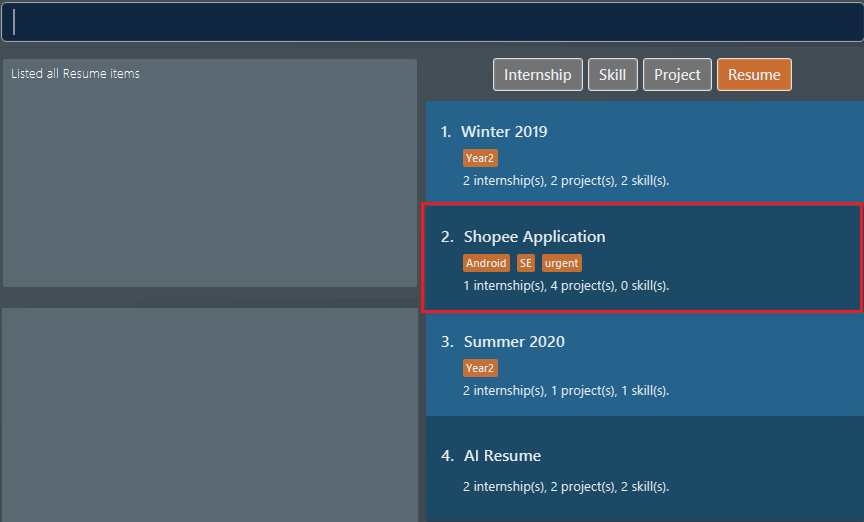 Figure 18. List of all resume items
 -
We delete the 2nd
resumewithdelete 2 i/ res.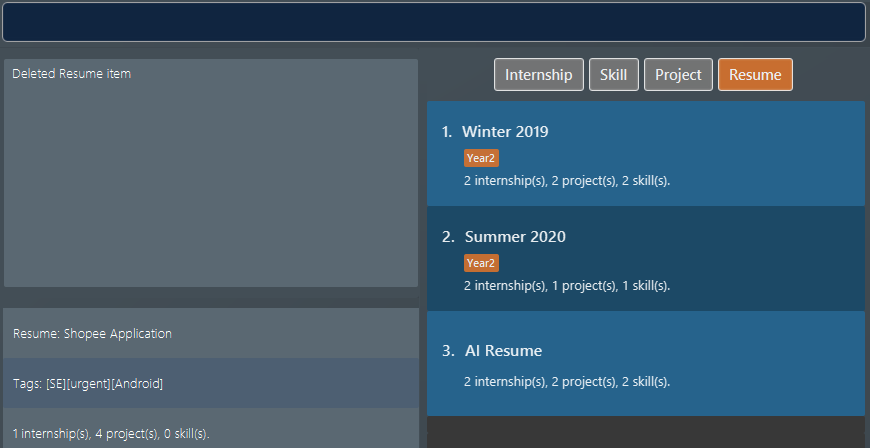 Figure 19. Application view after deleting the resume item at index 2
 -
We delete the 3rd
skillwithdelete 3 i/ ski. Do note how it is not a must for the list box to displayskillitems for deletion to proceed. After the deletion the list box is set to showskillitems.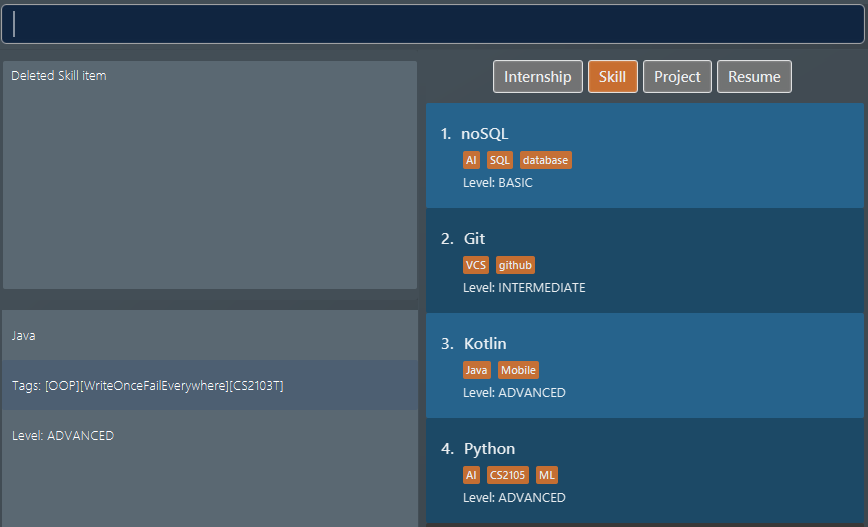 Figure 20. Application view after deleteing the skill item at index 3
{ end of delete section written by: Nguyen Minh Hoang}
{ start of sort section written by: Nguyen Minh Hoang}
4.8. Sorting an item list : sort
Sorts an item list in the ResuMe application.
Format: sort i/ TYPE order/ SORT_ORDER [reverse/ TRUE_OR_FALSE]
|
|
-
For the selected
TYPE, the list of items of that type will be sorted according toSORT_ORDER(see the note above for whatreverse/does). -
Below is the list of criteria by which different item types can be sorted:
| Item type | SORT_ORDER |
Criterion |
|---|---|---|
|
|
Name of |
|
|
Start date of |
|
|
Name of |
|
|
Date of |
|
|
Name of |
|
|
Level of proficiency of |
|
|
Name of |
|
|
Name of |
|
|
Deadline of |
Example:
-
We sort all
resumeitems by their name in ascending order withsort i/ res order/ name.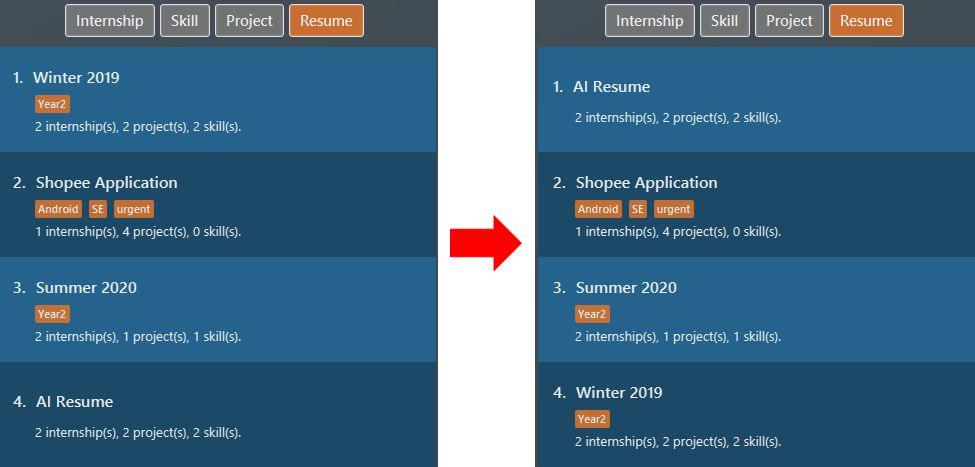 Figure 21. List of resume items sorted by name in ascending order
 -
We sort all
skillitems in descending level of proficiency withsort i/ ski order/ level reverse/ true.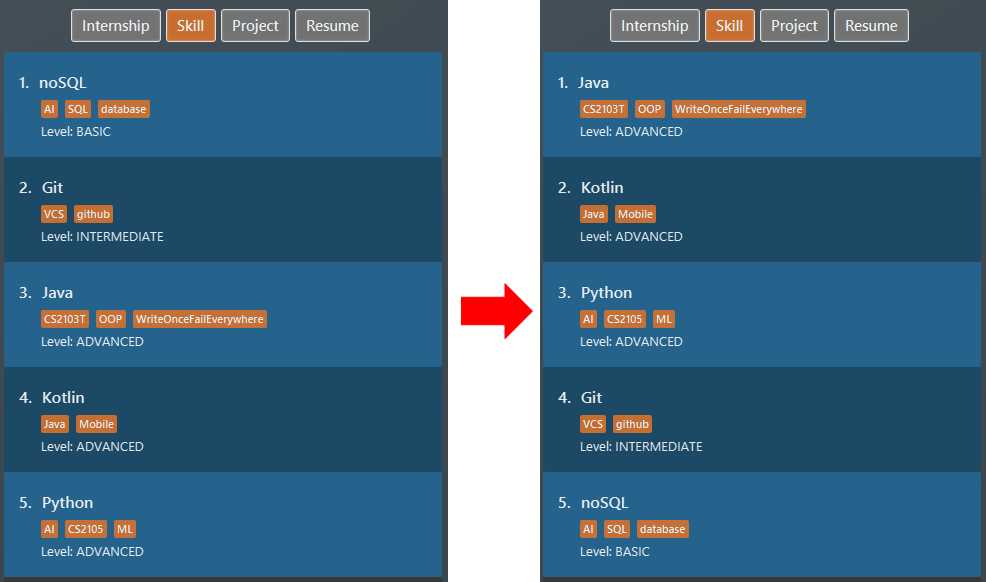 Figure 22. List of skill items sorted by level in descending order
 -
We sort all
internshipby their start date in ascending order withsort i/ int order/ time reverse/ false, specifyingreverse/this time because we really like to type.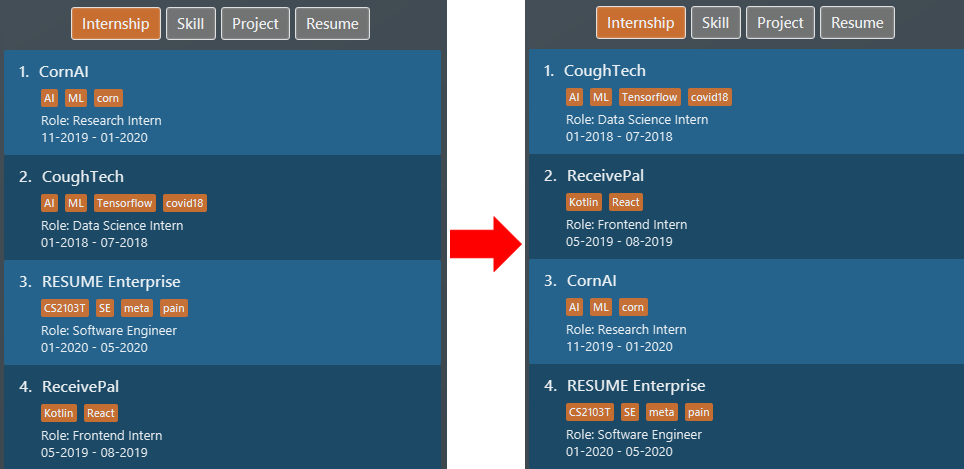 Figure 23. List of all note items sorted by deadline in ascending order
{ end of sort section written by: Nguyen Minh Hoang}
{ start of view section written by: Christian James Welly }
4.9. Viewing an item in details: view
Shows the detailed view of an item.
Format: view INDEX i/ TYPE
Certain details of specific items, for example the website and description of a project can only be viewed by using this command.
|
Example: Try typing in the command box these two commands one by one!
-
list i/ proj -
view 1 i/ proj
Outcome:
-
The first command lists out all the
projectitems in the list box. Assuming you want to view the details of theprojectitem at index 1.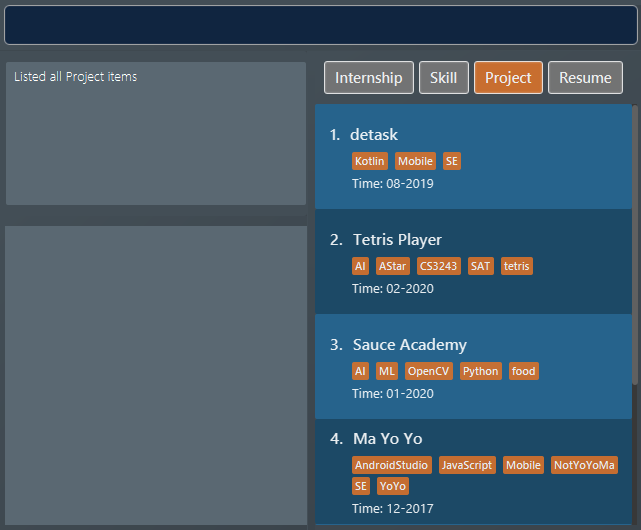 Figure 24. List of all project items
 -
The second command shows full details of the
projectat index 1, displayed in the view box. These includes details that were not shown in the list box, such as itswebsite("github.com/zheng-code/detask") and itsdescription("An all-in-one task managing app.").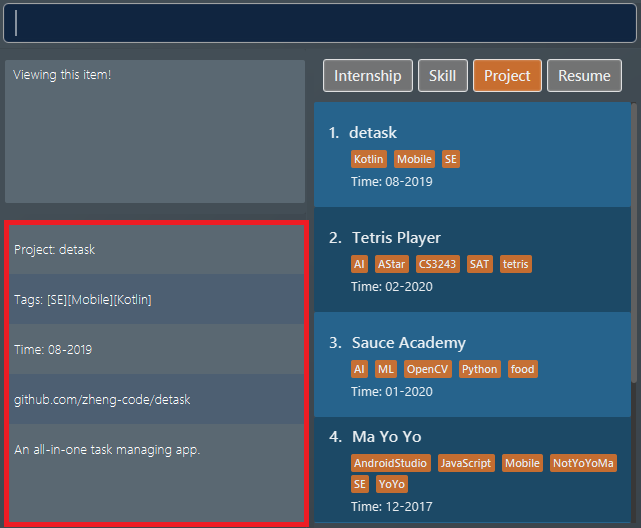 Figure 25. Updated View Box with the details of the project item at index 1
{ end of view section written by: Christian James Welly }
{ start of redit section written by: Christian James Welly }
4.10. Modifying the content a resume: redit
Modifies the content of a resume to contain the items specified in the command.
redit is a different command from edit. Please visit FAQ for more information.
|
Format: redit RESUME_INDEX TYPE/ [ITEM_INDEX…] [MORE_TYPE/ [ITEM_INDEX…]]…
If you find it a hassle to manually enter items into the resume, you can consider using tagpull!
|
-
For each
TYPE, existing items will be updated to the input items. -
You can add multiple items of a certain type to a
resumeby chainingITEM_INDEXafterTYPE/.
For exampleproj/ 3 6, will addprojectitem of indices 3 and 6 to theresume. -
You can remove all items of type
TYPEby typingTYPE/without specifying anyITEM_INDEXafter it.
Example 1: Adding items into a new resume
Before you try this example, please ensure you have added at least one internship, one project, and two skill items. You may verify for their presence by using the list command.
Try typing in these commands:
-
list i/ res -
redit 1 int/ 1 proj/ 1 ski/ 1 2
Outcome:
-
The first command lists out all
resumeitems. Assuming you want to modify the contents of the firstresumein the list box.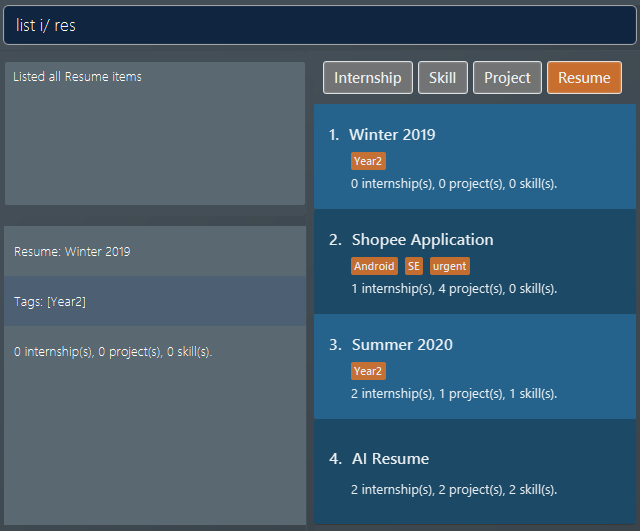 Figure 26. List of all resume items
 -
The second command modifies the
resumeat index 1, named "Winter 2019". Theresumenow contains theinternshipitem at index 1,projectitem at index 1, andskillitems at indices 1 and 2. The following screenshot illustrates what happens after this command: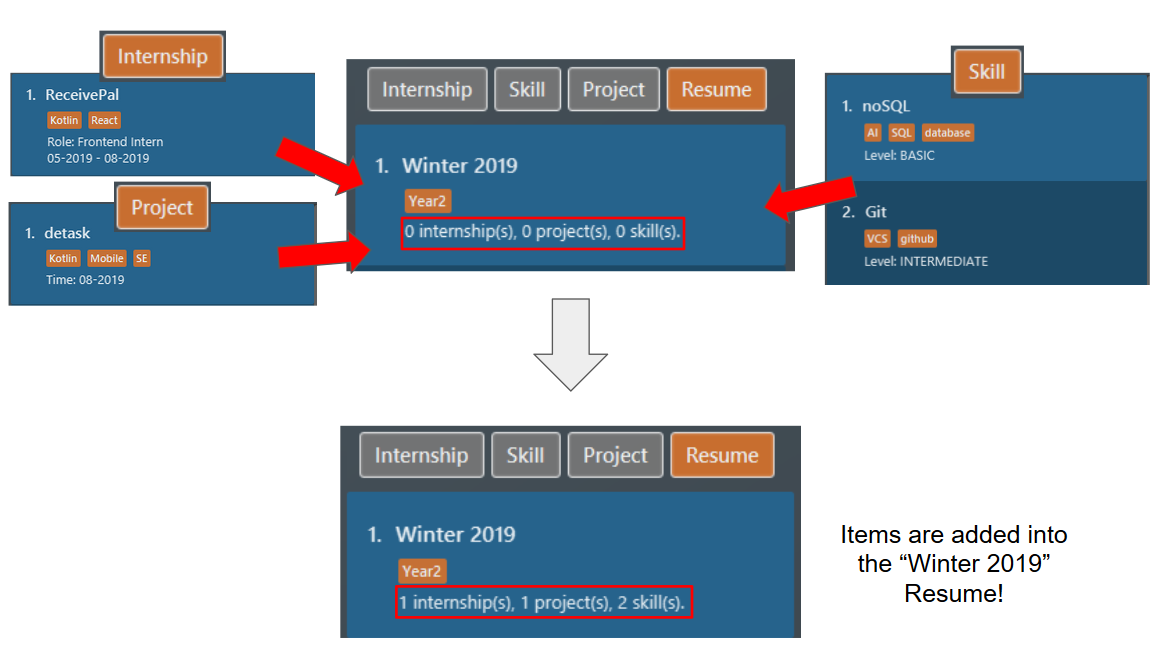 Figure 27. Resume content after adding new items
Example 2: Modifying the contents of the resume
Following from example 1, you realise that you actually wanted to use a different set of items for your "Winter 2019" resume. Here is how you can rectify this!
Before you try this example, please ensure you have added at least one internship and three skill items. You may verify for their presence by using the list command.
Try typing in these commands:
-
list i/ res -
redit 1 int/ 1 proj/ ski/ 3
Outcome:
-
The first command lists out all
resumeitems. Assuming you want to modify the contents of the firstresumein the list box. Since we are following from example 1, the "Winter 2019"resumewould already have some items in it.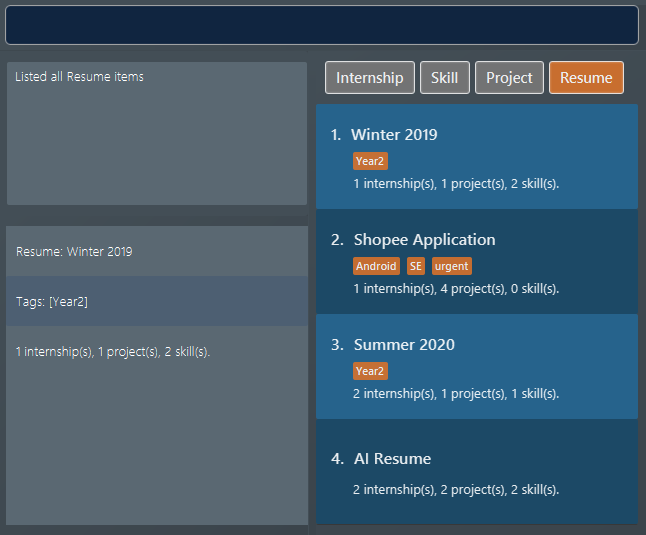 Figure 28. List of all resume items
 -
Before the second command, the
resumecontains the same set of items as the one in example 1. The command modifies theresumeat index 1, named "Winter 2019". Theresumenow still contains theinternshipitem at index 1, noprojectitems, andskillitem at index 3. The following screenshot illustrates what happens after this command: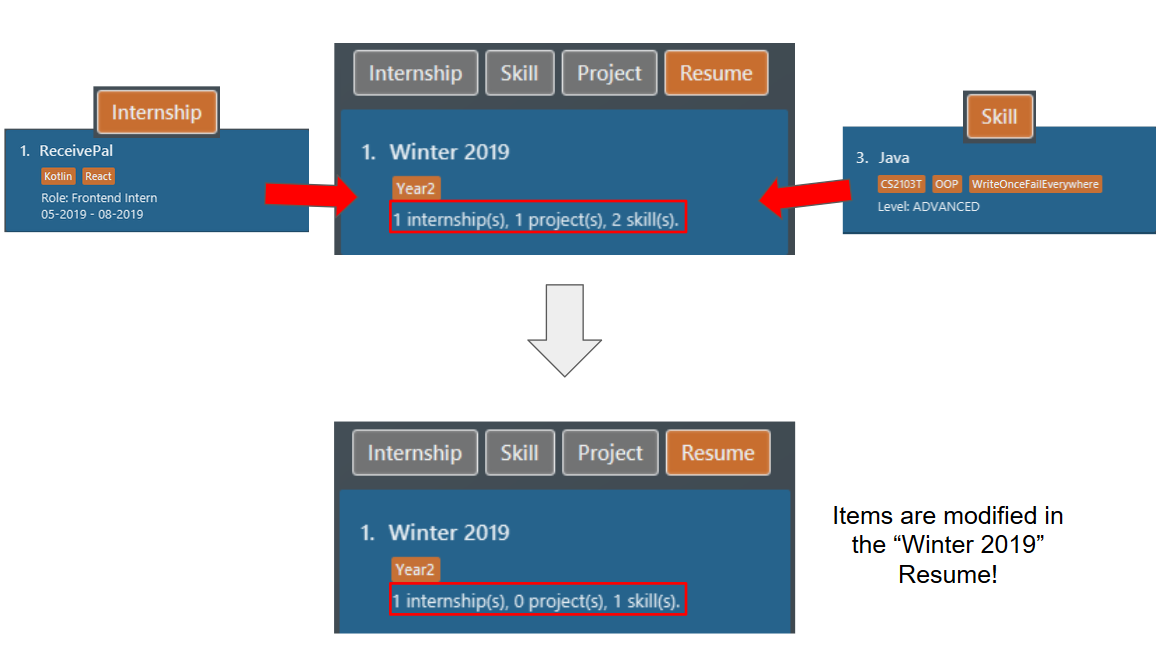 Figure 29. Resume content after modification
You can think of this command as using only the items that has been specified in the command. In this example, we no longer want the items we have previously added, and we would like the "Winter 2019" resume to contain only the first internship item and the third skill item.
Example 3: No modifications to internship and skill items
Following from example 2, you are now satisfied with the internship and skill items, but you would like to add a project item without changing the internship and skill items. Here is how you can do it!
Before you try out this example, please ensure you have at least two project items.
Try typing in these commands:
-
list i/ res -
redit 1 proj/ 2
Outcome:
-
The first command lists out all
resumeitems. Assuming you want to modify the contents of the firstresumein the list box. Since we are following from example 2, the "Winter 2019"resumewould already have some items in it.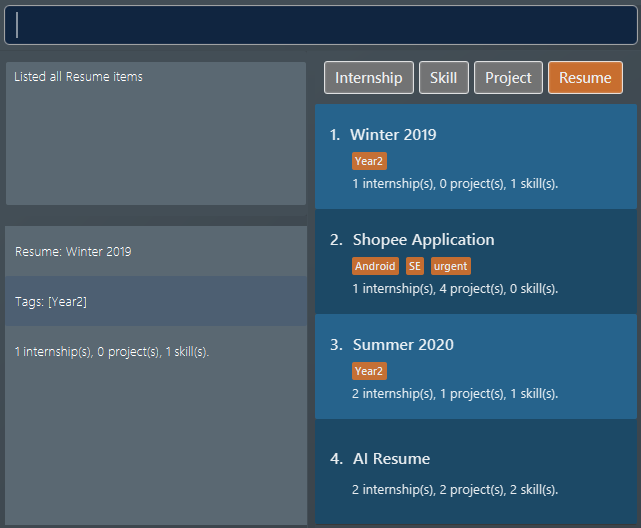 Figure 30. List of all resume items
 -
Before the second command, the
resumecontains the same set of items as the one in example 2. The command modifies theresumeat index 1, named "Winter 2019". Theresumewill now contain the theprojectitem at index 2. Theinternshipandskillitems remain unchanged. The following screenshot illustrates what happens after this command: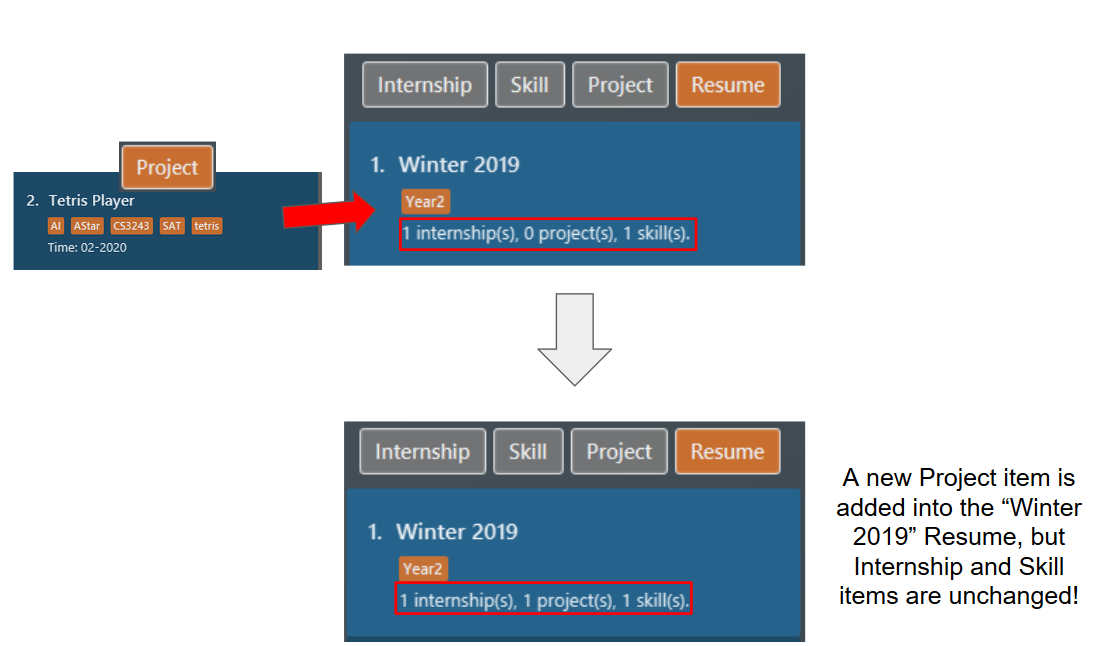 Figure 31. Resume content after modification
So by leaving out one of the prefixes (TYPE/ ITEM_INDEX…) from the command, you can keep some of the items in your resume!
{ end of redit section written by: Christian James Welly }
{ start of tagpull section written by: Christian James Welly }
4.11. Pulling tagged items into a resume: tagpull
Pulls all the internship, project and skill items with the specified tag(s) into a resume.
Format: tagpull RESUME_INDEX [#/ TAG]…
This command does not remove items from the resume and will add items on top of the existing items.
|
Example 1: Pulling items using one tag
Before you try this example, please ensure you have added some items with the tag "SE". You may verify for their presence by using the list command.
Try typing in these commands:
-
list i/ res -
tagpull 1 #/ SE
Outcome:
-
The first command lists out all
resumes. Assuming you want to modify the contents of the firstresumein the list box.
Figure 32. List of all resume items -
The second command pulls all items which has "SE" as the tag into the
resumeat index 1, named "Winter 2019". The following screenshot illustrates the outcome of the command if we have 1internshipitem and 2projectitems tagged with "SE".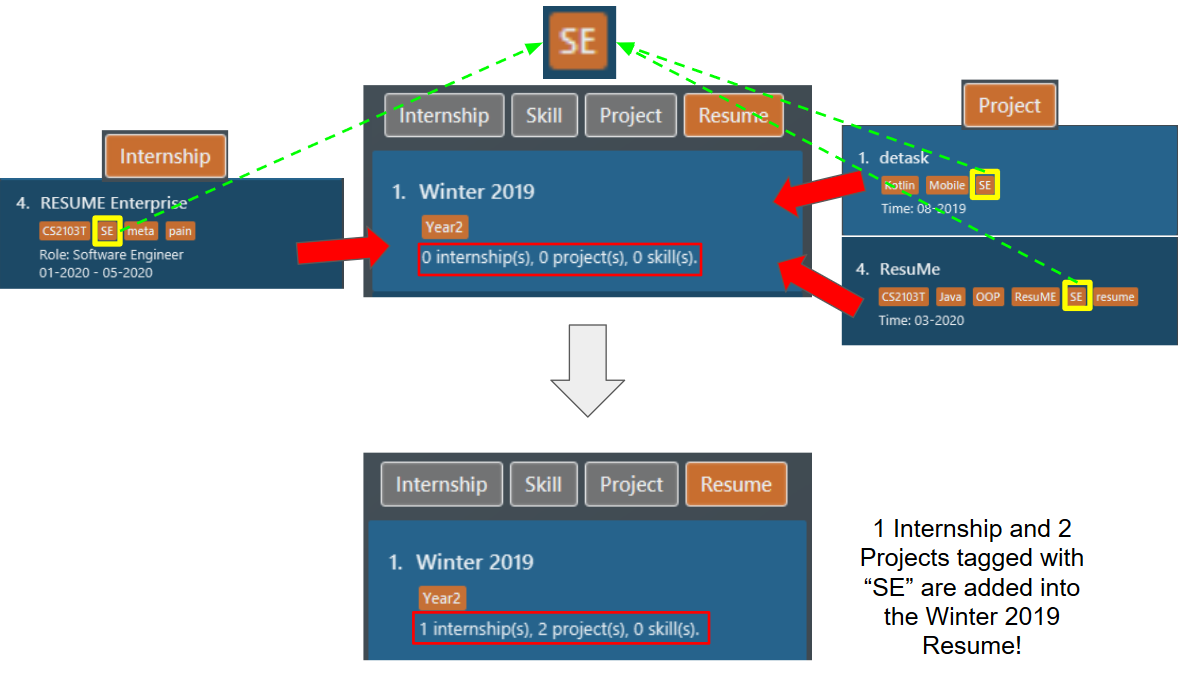 Figure 33. Resume content after
tagpull
Example 2: Pulling items using multiple tags
Now, maybe you have categorised your items by using multiple tags. So, you think just pulling items using one tags is not sufficient. Our tagpull supports that too!
Before you try this example, please ensure you have added some items with the tag "SE" and/or "github". You may verify for their presence by using the list command.
Try typing in these commands:
-
list i/ res -
tagpull 1 #/ SE #/ github
Outcome:
-
The first command lists out all
resumes. Assuming you want to modify the contents of the firstresumein the list box.
Figure 34. List of all resume items -
The second command pulls all items which has "SE" or "github" as the tag into the
resumeat index 1, named "Winter 2019". The following screenshot illustrates the outcome of the command if we have 1internshipitem and 2projectitems tagged with "SE", and 1skillitem tagged with "github". Figure 35. Resume content after tagpull
{ end of tagpull section written by: Christian James Welly }
{ start of undo section written by: Nguyen Minh Hoang}
4.12. Undoing a command: undo
Undoes the previous command and restores the state of the application to before that command is performed.
Format: undo
|
Example:
-
Suppose we hate Java and therefore want to delete it from the list of
skillitems using adelete 1 i/ skicommand. We also do alist i/ projto switch to viewing projects because that is how staging for an example works.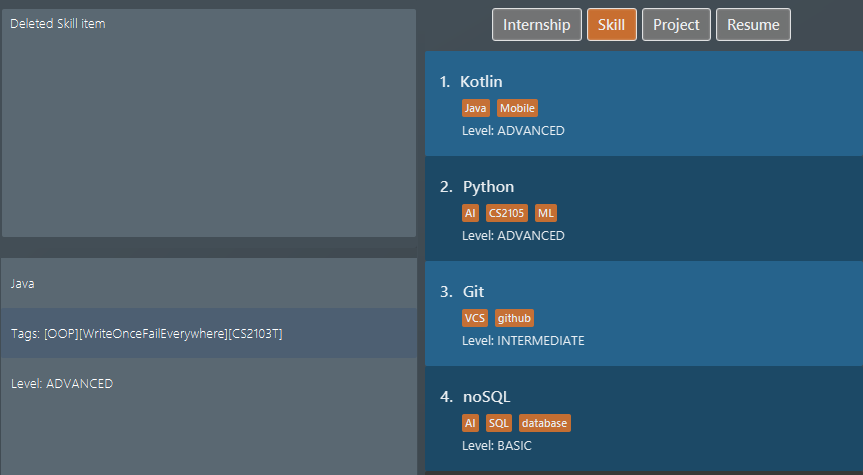 Figure 36. List of all skill items after deleting "Java"
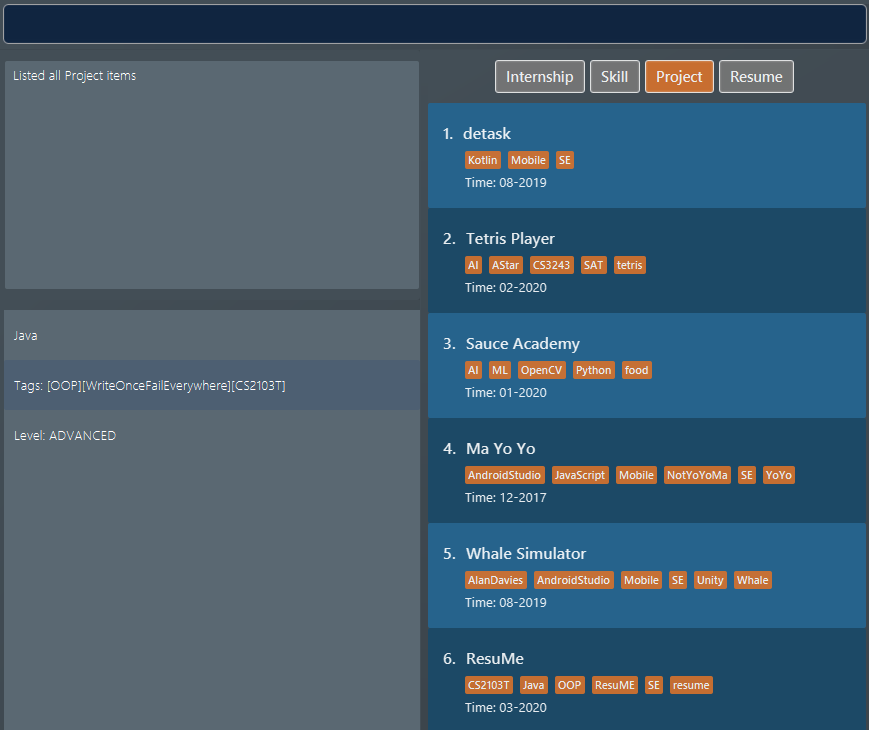 Figure 37. List of all project items
 -
But Stockholm’s syndrome kicks in and we decide that Java has its merits, so we revert our action with
undo. Voila, Java is back, and our list box now displaysskillitems.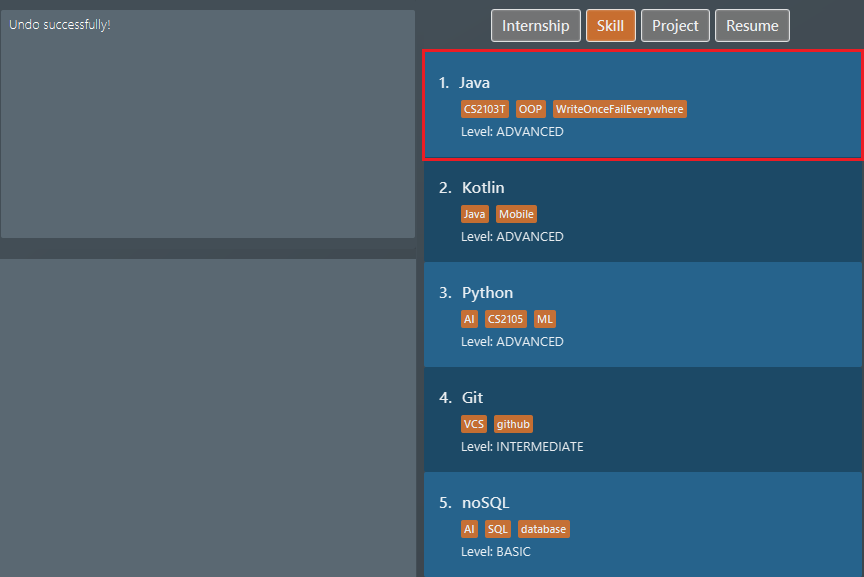 Figure 38. List of all skill items after undo
{ end of undo section written by: Nguyen Minh Hoang}
{ start of redo section written by: Nguyen Minh Hoang}
4.13. Redoing a command: redo
Redoes the most recent undone command and brings the application state to after the (re)execution of that command.
Format: redo
|
Example:
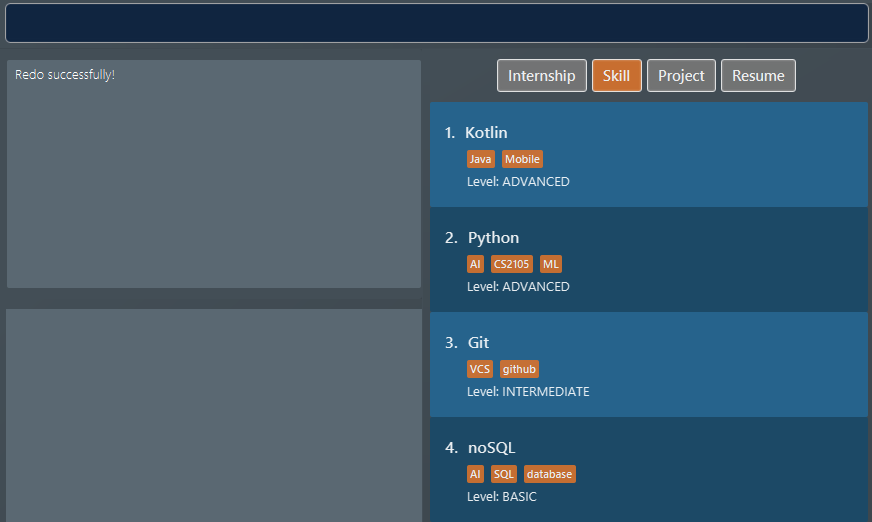
After the Java deletion incidence in the previous example section (for undo), we
decide that the merits of Java do not warrant the pain it wreaks so we want to redo our original decision to delete
Java. Once again, Java is removed from our life.
{ end of redo section written by: Nguyen Minh Hoang}
{ start of rpreview section written by: Nguyen Chi Hai }
4.14. Previewing a resume: rpreview
Previews a resume in text format in a pop-up window.
Format: rpreview RESUME_INDEX
|
|
Example: Let’s try out the following commands!
-
list i/ res -
rpreview 2
Outcome:
-
The first command lists out all
resumeitems. Assuming that you want to preview the secondresumein the list box.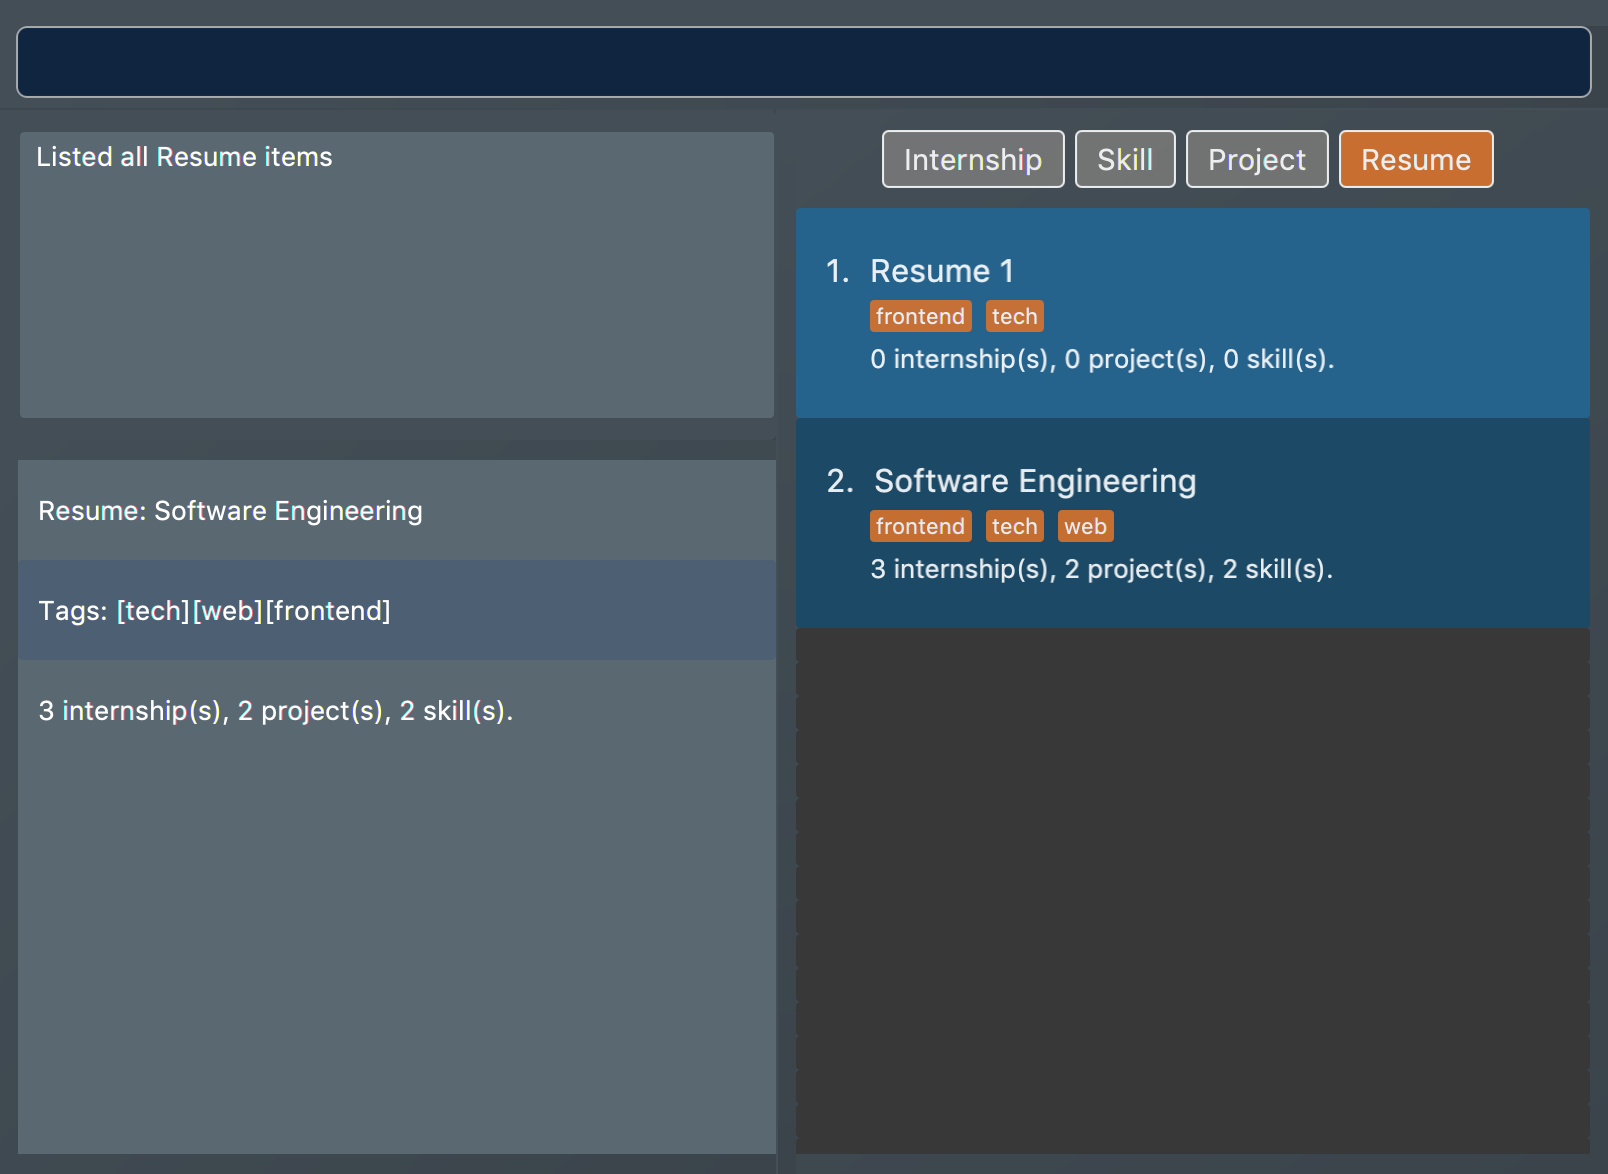 Figure 40. List of all resume items
 -
The second command will preview the
resumeat index 2 named "Software Engineering". A pop-up window will be opened, featuring a text-based view of the content of "Software Engineering". The screenshots of the results are as shown below: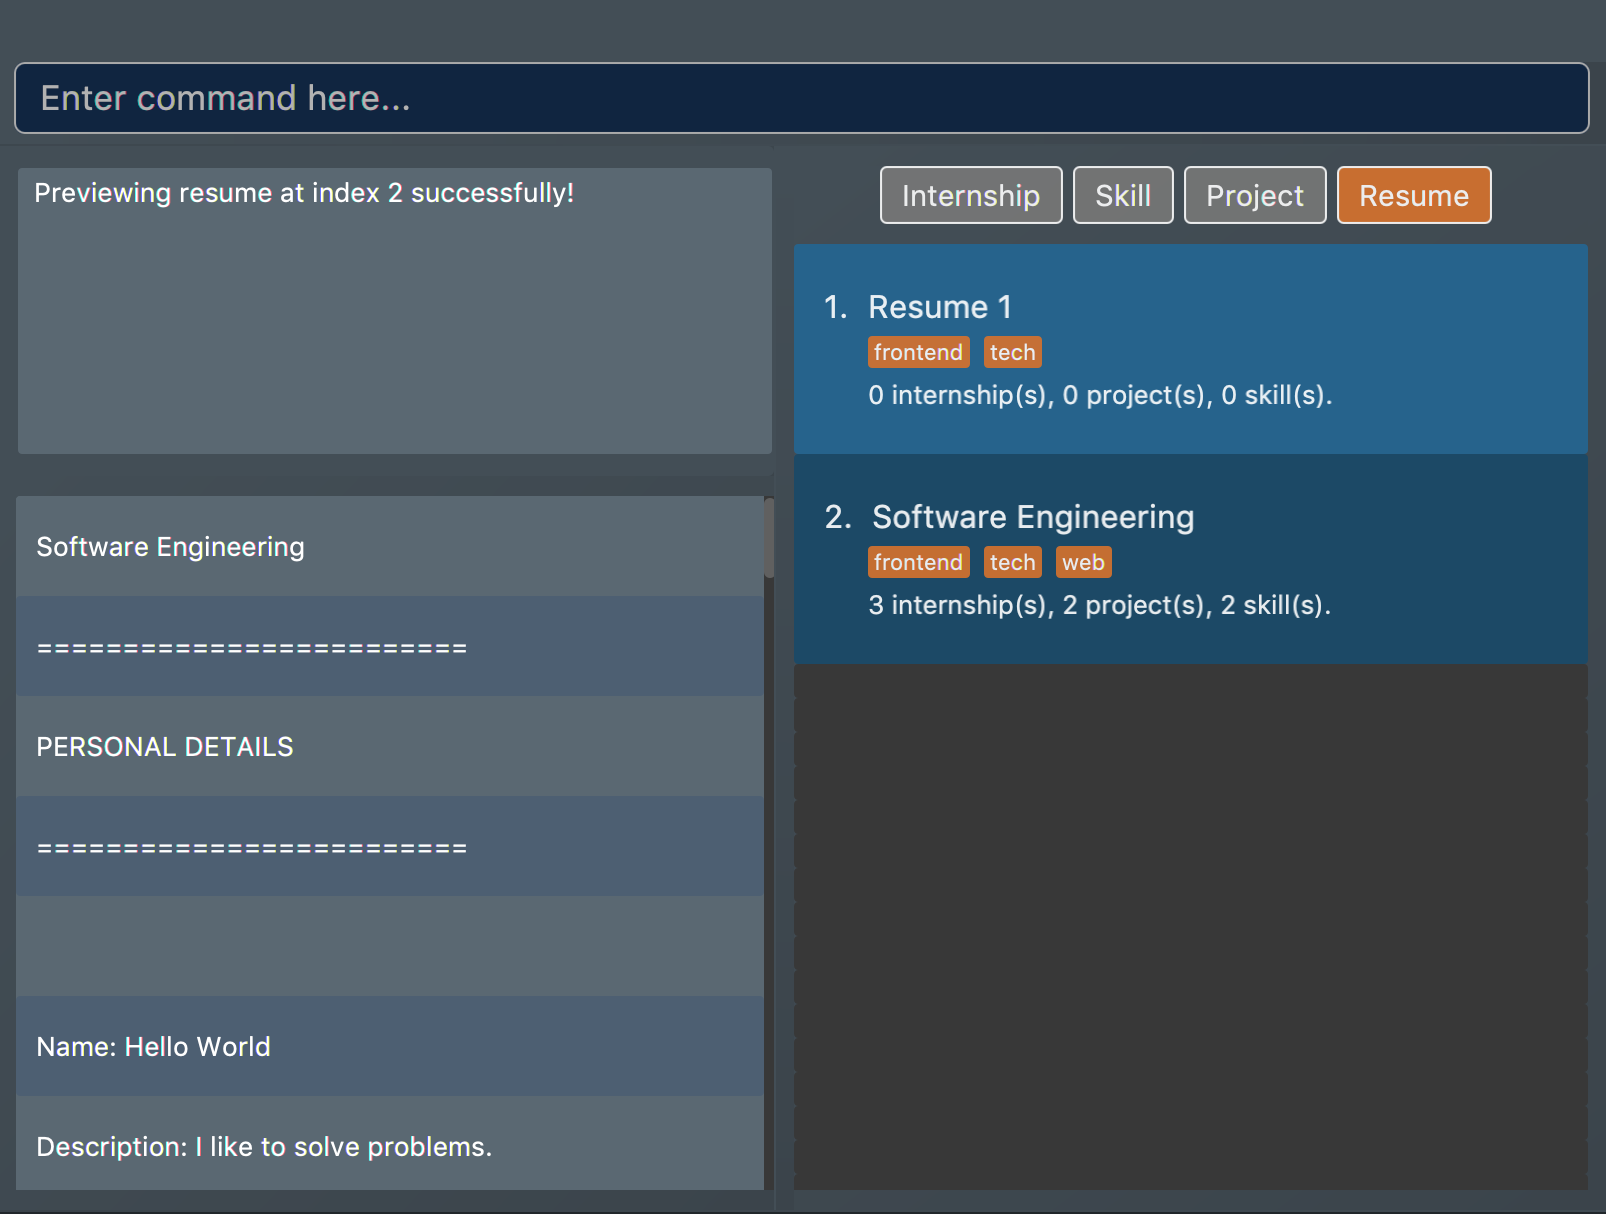 Figure 41. Application view after rpreview is executed
 Figure 42. Preview pop-up window
{ end of rpreview section written by: Nguyen Chi Hai }
{ start of rgen section written by: Pham Thuy Duong }
4.15. Generating a resume: rgen
Generates a .pdf file from an existing resume stored inside the application at the specified index.
Format: rgen RESUME_INDEX [n/ FILE_NAME]
-
A valid
RESUME_INDEXis a positive integer that identifies an existingresume. -
The exported
.pdffile will be located in the same folder as the application.jarfile.
It is optional to specify a FILE_NAME for the .pdf file.
If no name is specified, the filename will be set, by default, to the name of the generated resume.
|
Example: Let’s try out the following commands!
-
list i/ res -
rgen 1 n/ My Resume
Outcome:
-
The first command lists out all
resumeitems. Assuming that you want to generate the firstresumein the list box.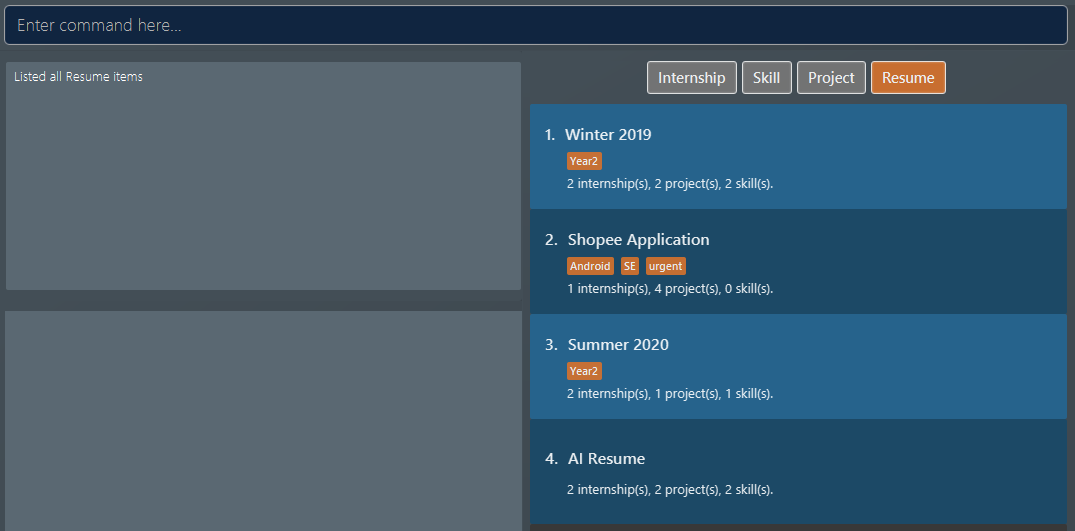 Figure 43. List of all resume items
 -
The second command generates a "My Resume.pdf" file from the specified resume. The screenshots of the application view and of the generated file are as below:
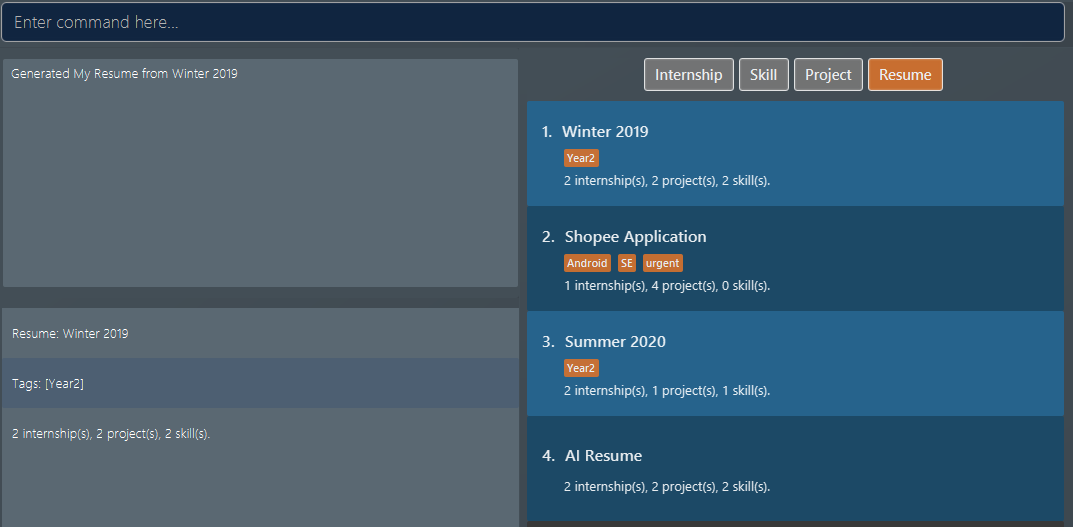 Figure 44. Application view after rgen is executed
 Figure 45. Generated .pdf file
{ end of rgen section written by: Pham Thuy Duong }
{ start of done section written by: Nham Quoc Hung }
4.16. Marking a note as done: done
Marks a Note at a specific index from the current note list as done.
Format: done INDEX
-
A valid
INDEXis a positive integer that identifies an existingnote.
Example: Let’s try out the following commands!
-
list i/ note -
done 1
Outcome:
-
The first command lists out all
noteitems.
Figure 46. List of all note items -
Assuming that you want to mark the first
notein the list asdone. The second command will achieve this, and you will be notified by the updating tick box.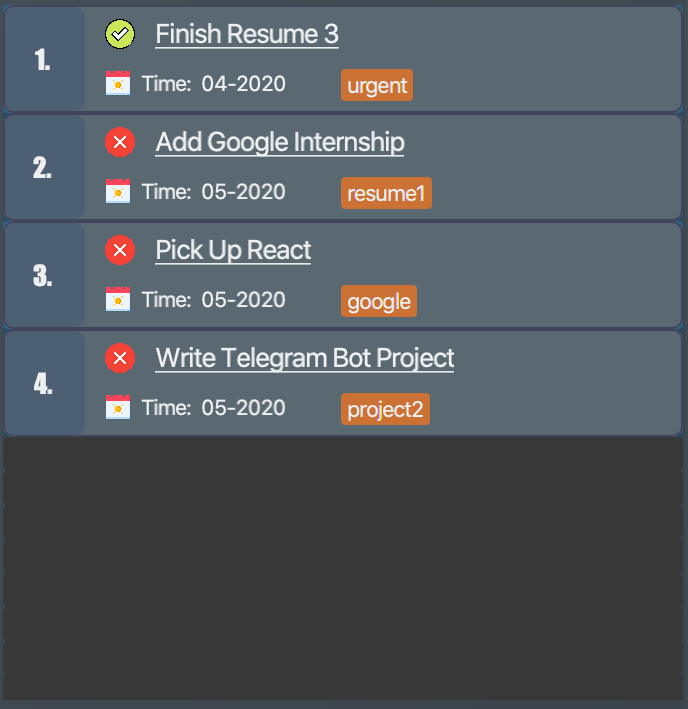 Figure 47. List of all note items after
donecommand is executed
{ end of done section written by: Nham Quoc Hung }
4.17. Clearing all data: clear
Clears all data from ResuMe. Empties all data in the resume book, user information is replaced with default user information.
Format: clear
| This command can be undone. |
{ start of exit section written by: Nham Quoc Hung }
4.18. Exiting the program : exit
Exits from ResuMe.
Format: exit
{ end of exit section written by: Nham Quoc Hung }
{ start of data-encryption section written by: Nguyen Minh Hoang}
4.19. Saving the data
ResuMe data is saved in the hard disk automatically after any command that changes the data. There is no need to save manually.
4.20. Encrypting data files [coming in v2.0]
We are currently working on a login feature that will let you set password for ResuMe. You will also be able to have your locally stored data encrypted, so that no one (even us) can gain access to your precious information.
We value your privacy and we want you to feel safe. Stay tuned!
{ end of data-encryption section written by: Nguyen Minh Hoang}
5. FAQ
Q: What is the difference between
reditandedit i/ res?A:
reditis used when you want to edit the content of aresume, in other words, add or remove certain items from thatresume. Meanwhile,edit i/ resis used when you want to edit attributes of theresume, like itsnameortags.
Q: How do I transfer my data to another Computer?
A: Install the app in the other Computer and overwrite the empty data file created with the data file of your ResuMe folder in the current Computer.
{ start of summary section written by: Nguyen Chi Hai }
6. Command Summary
This is a summary of all available commands for your reference.
6.1. General commands
These are commands that have consistent format regardless of item type.
| Command | Format |
|---|---|
Clear |
|
Delete |
|
Done |
|
Exit |
|
Find |
|
Help |
|
List |
|
Me |
|
Redo |
|
Sort |
|
Undo |
|
View |
|
6.2. Item-specific commands
These are commands whose format varies depending on item type.
| Command | Type | Format |
|---|---|---|
Add |
Internship |
|
Project |
|
|
Skill |
|
|
Resume |
|
|
Note |
|
|
Edit |
Internship |
|
Project |
|
|
Skill |
|
|
Resume |
|
|
Note |
|
6.3. Resume commands
These are commands specific to resume items.
| Command | Format |
|---|---|
Edit Resume |
|
Generate Resume |
|
Preview Resume |
|
Tag Pull |
|
{ end of summary section written by: Nguyen Chi Hai }